Tuesday, November 5, 2013

Understanding SSL


For understanding SSL , first thing to understand is Digital Certificate.

Digitally signed CA certificate

Below is the key point which define a digitally signed certificate-
It is standard for verifying a client ,server or any third party.

It has following 4 key elements -
1. Organizational information
This section of the certificate contains information that uniquely identifies the owner of the certificate, such as organizational name and address. You supply this information when you generate a certificate using a certificate management utility.
2. Public key
The receiver of the certificate uses the public key to decipher encrypted text sent by the certificate owner to verify its identity. A public key has a corresponding private key that encrypts the text.
3. Certificate authority's distinguished name
The issuer of the certificate identifies itself with this information.
4. Digital signature
The issuer of the certificate signs it with a digital signature to verify its authenticity. This signature is compared to the signature on the corresponding CA certificate to verify that the certificate originated from a trusted certificate authority.

SSL
SSL is a process used for authenticating a caller using digitally signed certificate .The cert can be signed by third party CA authority or self signed using utility tools.
One-Way SSL
One way SSL is used by clients to authenticate the server
The service provider i.e. the server shares its digital certificate with the client and client store it in its truststore.
Truststore keystore is the certificate repository where the server/client stores all the thirdparty certificates. 
Identity keystore is the certificate repository where server/client store its own certificate
Before the actual message is transmitted the handshake needs to be done and establish the connection successfully.
Client has the servers public key ( contained in the certificate that server shared).
One important point to remember is that there is unique private-public key pair which the server has.Public key is present in the certificate and shared with the client .Private key is kept secret.Any message encrypted using a private key can be decrypted only with its unique public key .

Below are the steps to establish connection in case of One way SSL -

1. Client requests for a protected resource from the server.
2. Server sends it's certificate to the client
3. Client validates the digital signature in the received certificate against the digital signature present in the certificate which the client already has in its trust store. If the digital signature match that means the digital certificate is generated from valid CA authority and has not been tampered in between.
4.Client request the server to prove server's identity (ownership).
5. So the server sends back message encrypted using servers private key .  
6. Client validates the servers identity using servers public key which was sent as part of digital certificate.
7.On successful validation a handshake is done and connection is established between client and the server.
8. Server sends the requested resource to the client.

This is one way SSL and in case of 2 way SSL ,the server also validates the client similarly.


Sunday, September 8, 2013

SOAP handler with SAML Authentication


SOAP Handler
A SOAP message handler provides a mechanism for intercepting the SOAP message in both the request and response of the Web Service. You can create handlers in both the Web Service itself and the client applications that invoke the Web Service.
A simple example of using handlers is to access information in the header part of the SOAP message. You can use the SOAP header to store Web Service specific information and then use handlers to manipulate it.
You can also use SOAP message handlers to improve the performance of your Web Service. After your Web Service has been deployed for a while, you might discover that many consumers invoke it with the same parameters. You could improve the performance of your Web Service by caching the results of popular invokes of the Web Service (assuming the results are static) and immediately returning these results when appropriate, without ever invoking the back-end components that implement the Web Service. You implement this performance improvement by using handlers to check the request SOAP message to see if it contains the popular parameters.

Sample implementation of client handler with SAMP authentication - 

 public class SampleClientHandler implements Handler {

private final String CLASSNAME = "SampleClientHandler ";
public void destroy() {
// TODO Auto-generated method stub

}

public QName[] getHeaders() {
// TODO Auto-generated method stub
return null;
}

public boolean handleFault(MessageContext arg0) {
// TODO Auto-generated method stub
return false;
}

/**
 * Method to add the security part for saml in the soap header 
 */
public boolean handleRequest(MessageContext messageContext) {
try {
SOAPFactory soapFactory =SOAPFactory.newInstance();
SOAPElement security=soapFactory.createElement("Security", "wsse", ns);

String authNS = "urn:oasis:names:tc:SAML:1.0:assertion";
SOAPElement usernameToken = security.addChildElement("UsernameToken",                                            "wsse",authNS);
Name wsuId  = soapFactory.createName("wsu:Id");
Name xmlnsWsu  = soapFactory.createName("xmlns:wsu");
if(usernameToken==null){
System.out.println( "usernameToken ==null ");
}
usernameToken.addAttribute(wsuId, "UsernameToken-72");
usernameToken.addAttribute(xmlnsWsu, "xsd location");

SOAPElement userName = usernameToken.addChildElement("Username",                                                  "wsse",authNS);
userName.addTextNode(username);
SOAPElement password = usernameToken.addChildElement("Password", "wsse",authNS);
Name type  = soapFactory.createName("Type");
password.addAttribute(type,"PWD");

SOAPElement assertion = security.addChildElement("Assertion",                                                                 "ns1","urn:oasis:names:tc:SAML:1.0:assertion");
Name assertionID = soapFactory.createName("AssertionID");
Name issueInstant = soapFactory.createName("IssueInstant");
Name issuer = soapFactory.createName("Issuer");
Name majorVersion = soapFactory.createName("MajorVersion");
Name minorVersion = soapFactory.createName("MinorVersion");

assertion.addAttribute(assertionID, "disputes");
assertion.addAttribute(issueInstant, strSysdate);
assertion.addAttribute(issuer, "xyz.com");
assertion.addAttribute(majorVersion, "1");
assertion.addAttribute(minorVersion, "1");


SOAPElement authenticationStatement =                                                                                                      assertion.addChildElement("AuthenticationStatement", "ns1",authNS);
Name authenticationInstant = soapFactory.createName("AuthenticationInstant");
Name authenticationMethod = soapFactory.createName("AuthenticationMethod");
authenticationStatement.addAttribute(authenticationInstant, strSysdate);
authenticationStatement.addAttribute(authenticationMethod,                                                                          "urn:oasis:names:tc:SAML:1.0:am:password");

SOAPElement subject = authenticationStatement.addChildElement("Subject",                                                "ns1",authNS);
SOAPElement nameIdentifier = subject.addChildElement("NameIdentifier", "ns1",authNS);

nameIdentifier.addTextNode(strNameIdentifier);

SOAPElement subjectConfirmation = subject.addChildElement("SubjectConfirmation",                                  "ns1",authNS);
SOAPElement confirmationMethod =                                                                                                           subjectConfirmation.addChildElement("ConfirmationMethod","ns1",authNS);
confirmationMethod.addTextNode("urn:oasis:names:tc:SAML:1.0:cm:sender-vouches");

SOAPMessageContext soapMessageContext = (SOAPMessageContext)messageContext;
SOAPEnvelope soapEnvelop                                                                                                                       soapMessageContext.getMessage().getSOAPPart().getEnvelope();
soapEnvelop.getHeader().addChildElement(security);

return true;

} catch (SOAPException e) {
e.printstacktrace();
}
               return false;
}

public boolean handleResponse(MessageContext messageContext) {
//Log the respone received
SOAPMessageContext soapMessageContext = (SOAPMessageContext)messageContext;
logToSystem(soapMessageContext);

return false;
}

public void init(HandlerInfo arg0) {
// TODO Auto-generated method stub
}

/**
 * Method to log the resquest or response to the system.out printstream
 * @param soapMessageContext
 * @throws SOAPException
 * @throws IOException
 */
public void logToSystem(SOAPMessageContext soapMessageContext){

try {
SOAPMessage soapMessage  =soapMessageContext.getMessage();

soapMessage.writeTo(System.out);
//Log to logger file
/*ByteArrayOutputStream byteArrayOutputStream = new ByteArrayOutputStream();
soapMessage.writeTo(byteArrayOutputStream);
String strXml = byteArrayOutputStream.toString();

logger.info(strXml);*/


} catch (Exception e) {
e.printstacktrace();
}

}

Creating unmodifiable static map


Unmodifiable static map


public static final Map unmodifiableMap = Collections.unmodifiableMap(
new HashMap(){{
    put("key1","value1");
    put("key2","value2");
}}
);


Friday, June 1, 2012

Understanding Chess notations

Below is the most popular - Algebraic chess notation


It will also allow them to be able to read chess books. There are a number of different types of chess notations but the most popular type used today is called Algebraic Notation. Practically all new chess books use this type of notation.

In Algebraic Notation the chessboard is divided into ranks and files. The ranks are the horizontal rows of squares labeled 1 through 8. The files are the vertical columns of squares labeled a through h. Each square on the chessboard can be identified by a unique combination of file and rank. For example, the highlighted square on the right is called c7 because it lies on the c file and the 7 rank. Some boards do not have the ranks and files labeled so it is a good idea to familiarize yourself with it. From the perspective of the White side, the files are always labeled a through h going from left to right and the ranks are always labeled 1 through 8 going from bottom to top.


Pieces are identified by a single capital letter. This is usually the letter their names start with. The exception is the Knight. Since the K is used for a King, the Knight is identified by an N.
K - King
Q - Queen
R - Rook
B - Bishop
N - Knight
To notate a piece moving on the chessboard first write the piece identifier and then the square the piece is moving to. In the diagram on the left the Knight is moving to square f3 so this is written Nf3.


What if a Pawn moves? In case you didn't notice, there is no piece identifier for a Pawn. Pawns don't need an identifier. If no piece identifier is used then it is assumed that the moving piece is a Pawn. To notate a Pawn moving, just write the square it is moving to. In the diagram on the right the Pawn is moving to e5 so this is simply written e5.


Captures are indicated with an x between the piece identifier and square where the capture takes place. When the Bishop captures the Rook in the diagram on the left it will be written as Bxh8.


When a Pawn captures a piece, instead of using a piece identifier you use the file identifier of the Pawn's location before the capture. The Pawn capture on the right would be written cxd4.


Occasionally identical pieces can move to the same square. To distinguish between them include either the file identifier of the piece that is moving if the ambiguous pieces lie on the same rank, or the rank identifier if they lie on the same file. For example, both rooks can move to the square b5 in the diagram on the left so Rb5 would be ambiguous. In order to distinguish the Rook on b2 from the Rook on b7 the notation should include the rank identifier of the b2 Rook as in R2b5.


A King-side castle is represented by O-O. A Queen-side castle is O-O-O. When a move attacks the enemy King the notation is followed by a +. When a move checkmates the enemy King the notation is followed by a ++ or a #. When a Pawn makes it to the opposite side of the board and promotes to another piece you would notate the move as usual followed by the piece identifier for the piece the pawn promoted to. For example, when the Pawn at right captures the Queen and promotes to a Queen itself, thus checking the enemy King, it would be written cxd8Q+.


Sometimes additional commentary is added to the end of the notation to describe the move in more detail. Here are a few symbols along with their meanings:
!!- Brilliant move
!- Good move
!?- Interesting move
?!- Dubious move
?- Bad move
??- Blunder

Now that you are an expert on Algebraic Notation, see if you can follow this game:

White

Black

1.e4d5
2.exd5Nf6
3.d4Bg4
4.Bb5+c6?!
5.dxc6!Bxd1?
6.c7+Qd7??
7.c8Q#


Summary -


The rows of squares on the chessboard are called ranks and the columns of squares are called files. The ranks are labelled from 1 to 8 and the files are labelled from a - h. We use these numbers and letters to describe where pieces are on the chessboard. In the diagram the blue cross is on the squared named f3 and the circle is on c7. Notice how the letter always comes first and the number follows it.


Ranks and Files
There are some symbols you should know when reading or writing chess notation.
SymbolMeaningSymbolMeaning
KKingQQueen
RRookBBishop
NKnightxCaptures
+Check++ or #Checkmate
O-OCastles King's sideO-O-OCastles Queen's side
If you play in tournaments you will have to record the game so it is a good idea to practise as soon as you begin playing. You can also later go over your games to find out where you or your opponent made mistakes.
The moves are written in two numbered vertical columns like this:
1.f2-f4 e7-e5
2.f4xe5d7-d6
3.e5xd6 Bf8xd6
4.g2-g3 Qd8-g5
5.Ng1-f3Qg5xg3+
6.h2xg3 Bd6xg3#
The first column is for the White moves and the second column is for the Black moves. First of all the symbol for the piece is written, then the square on which this piece was standing, then a hyphen (-), then the square to which this piece moves. If a pawn moves the symbol is omitted.

For example, 1. f2-f4 means on the first move the pawn on the f2 square moved to the f4 square. 5. Ng1-f3 means the Knight on the g1 square moved to the f3 square.

If you wish to refer to a Black move by itself you put three dots before the move. For example, 4. ... Qd8-g5 means on move 4 Black moved his Queen on d8 to g5.

x indicates a capture took place so: 5. ... Qg5xg3+ means the Black Queen on g5 captured a piece on g3 and the + means with this move the opponent's King was checked.

# means checkmate so: 6. ...Bd6xg3# means the Black Bishop on d6 moved to g3 and checkmated the White King.
This is what this game would look like on the chessboard:
Du Mont GameDu Mont Game
1. f2-f4 e7-e52. f4xe5 d7-d6
Du Mont GameDu Mont Game
3. e5xd6 Bf8xd64. g2-g3 Qd8-g5
Du Mont GameDu Mont Game
5. Ng1-f3 Qg5xg3+6. h2xg3 Bd6xg3#

Thursday, May 31, 2012

HPROF - Memory leak analysis

Monitoring and troubleshooting tools 
  • Quest Foglight (JVM and garbage collection monitoring)
  • jmap (hprof / Heap Dump generation tool)
  • Memory Analyzer 1.1 via IBM support assistant (hprof Heap Dump analysis)
  • Platform type: Middle tier
Step #1 – WLS 9.2 Admin server JVM monitoring and leak confirmation 

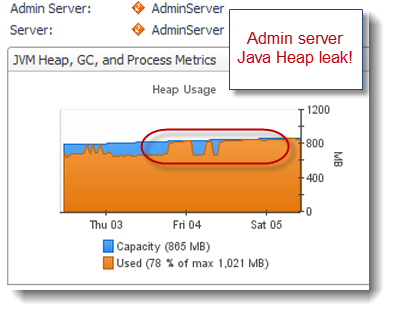
The Quest Foglight Java EE monitoring tool was quite useful to identify a Java Heap leak from our Weblogic Admin server. As you can see below, the Java Heap memory is growing over time. 

If you are not using any monitoring tool for your Weblogic environment, my recommendation to you is to at least enable verbose:gc of your HotSpot VM. Please visit my Java 7 verbose:gc tutorial on this subject for more detailed instructions. 


Step #2 – Generate a Heap Dump from your leaking JVM 

Following the discovery of a JVM memory leak, the goal is to generate a Heap Dump file (binary format) by using the Sun JDK jmap utility. 

** please note that jmap Heap Dump generation will cause your JVM to become unresponsive so please ensure that no more traffic is sent to your affected / leaking JVM before running the jmap utility ** 
1/bin/jmap -heap:format=b
This command will generate a Heap Dump binary file (heap.bin) of your leaking JVM. The size of the file and elapsed time of the generation process will depend of your JVM size and machine specifications / speed. 


For our case study, a binary Heap Dump file of ~ 2 GB was generated in about 1 hour elapsed time. 

Sun HotSpot 1.5/1.6/1.7 Heap Dump file will also be generated automatically as a result of a OutOfMemoryError and by adding -XX:+HeapDumpOnOutOfMemoryError in your JVM start-up arguments. 

Step #3 – Load your Heap Dump file in Memory Analyzer tool 

It is now time to load your Heap Dump file in the Memory Analyzer tool. The loading process will take several minutes depending of the size of your Heap Dump and speed of your machine. 


Step #4 – Analyze your Heap Dump 

The Memory Analyzer provides you with many features, including a Leak Suspect report. For this case study, the Java Heap histogram was used as a starting point to analyze the leaking objects and the source. 


For our case study, java.lang.String and char[] data were found as the leaking Objects. Now question is what is the source of the leak e.g. references of those leaking Objects. Simply right click over your leaking objects and select >> List Objects > with incoming references 


As you can see, javax.management.ObjectName objects were found as the source of the leaking String & char[] data. The Weblogic Admin server is communicating and pulling stats from its managed servers via MBeans / JMX which create javax.management.ObjectName for any MBean object type. Now question is why Weblogic 9.2 is not releasing properly such Objects… 

Root cause: Weblogic javax.management.ObjectName leak! 

Following our Heap Dump analysis, a review of the Weblogic known issues was performed which did reveal the following Weblogic 9.2 bug below: 

  • Weblogic Bug ID: CR327368
  • Description: Memory leak of javax.management.ObjectName objects on the Administration Server used to cause OutOfMemory error on the Administration Server.
  • Affected Weblogic version(s): WLS 9.2
  • Fixed in: WLS 10 MP1
http://download.oracle.com/docs/cd/E11035_01/wls100/issues/known_resolved.html
This finding was quite conclusive given the perfect match of our Heap Dump analysis, WLS version and this known problem description. 

Conclusion 

I hope this tutorial along with case study has helped you understand how you can pinpoint the source of a Java Heap leak using jmap and the Memory Analyzer tool. 


Reference
http://www.javacodegeeks.com

JAVA Heap Analysis - GC limit exeeded


Troubleshooting tools

** all these tools can be downloaded for free **
  •  Eclipse Indigo Release 
  •  Memory Analyzer via IBM Support Assistant 4.1 (HotSpot Heap Dump analysis) 
  • Java VM: Windows HotSpot JRE 1.6.0_24 64-bit

Sample Java program

The simple sample Java program below will be used to triggered an OutOfMemoryError; allowing us to analyze the generated HotSpot Heap Dump file. Simply create a new Java class : JVMOutOfMemoryErrorSimulator.java to the Eclipse project of your choice and either rename or keep the current package as is.

This program is basically creating multiple String instances within a Map data structure until the Java Heap depletion.


** please make sure your Eclipse compiler and JRE is 1.6 **
01package org.ph.javaee.javaheap;
02
03import java.util.Map;
04import java.util.HashMap;
05
06/**
07* JVMOutOfMemoryErrorSimulator
08*
09* @author PH
10
11*/public class JVMOutOfMemoryErrorSimulator {
12
13       private final static int NB_ITERATIONS = 500000;
14
15       // ~1 KB data footprint      
16       private final static String LEAKING_DATA_PREFIX = "datadatadatadatadatadatadatadatadatadatadatadatadatadatadatadatadatadatadatadat
17adatadatadatadatadatadatadatadatadatadatadatadatadatadatadatadatadatadatadatadat
18adatadatadatadatadatadatadatadatadatadatadatadatadatadatadatadatadatadatadatadat
19adatadatadatadatadatadatadatadatadatadatadatadatadatadatadatadatadatadatadatadat
20adatadatadatadatadatadatadatadatadatadatadatadatadatadatadatadatadatadatadatadat
21adatadatadatadatadatadatadatadatadatadatadatadatadatadatadatadatadatadatadata";
22
23       // Map used to stored our leaking String instances      
24       private static Map leakingMap;
25
26       static {             
27              leakingMap = new HashMap();      
28       }
29
30       /**       
31        * @param args       
32        */      
33        public static void main(String[] args) {
34
35              System.out.println("JVM OutOfMemoryError Simulator 1.0");         
36              System.out.println("Author: Pierre-Hugues Charbonneau");         
37              System.out.println(" http ://javaeesupportpatterns.blogspot.com/");
38
39              try {
40
41                     for (int i = 0; i < NB_ITERATIONS; i++) {
42
43                          String data = LEAKING_DATA_PREFIX + i;
44
45                          // Add data to our leaking Map data structure...     
46                          leakingMap.put(data, data);
47
48                     }
49
50              catch (Throwable any) {                    
51                     if (any instanceof java.lang.OutOfMemoryError){
52                             System.out.println("OutOfMemoryError triggered! "
53                                         + any.getMessage() + " [" + any + "]");
54
55                     else {                          
56                           System.out.println("Unexpected Exception! " +
57                                   any.getMessage() + " [" + any + "]");
58                            }             
59                     }
60
61                     System.out.println("simulator done!");      
62            }
63
64}

Step #1 - Setup your JVM start-up arguments

First, setup your Eclipse Java runtime arguments as per below. For our example, we used an external JRE 1.6 outside the Eclipse IDE with a Java Heap maximum capacity of 512 MB.

The key JVM argument allowing us to generate a Heap Dump is -XX:+HeapDumpOnOutOfMemoryError which tells the JVM to generate a Heap Dump following an OutOfMemoryError condition.


Step #2 - Run the sample Java program

The next step is to run our Java program. Depending on your computer specs, this program will run between 5-30 seconds before existing with an OutOfMemoryError.


As you can see, the JVM generated a Heap Dump file java_pid3880.hprof . It is now time to fire the Memory Analyzer tool and analyze the JVM Heap Dump.

Step #3 - Load the Heap Dump

Analyzing a Heap Dump is an analysis activity that can be simple or very complex. The goal of this tutorial is to give you the basics of Heap Dump analysis. For more Heap Dump analysis, please refer to the other case studies of this Blog.


Step #4 - Analyze Heap Dump

Below are the snapshots and analysis steps that you can follow to understand the memory leak that we simulated in our sample Java program.


As you can see, the Heap Dump analysis using the Memory Analyzer tool was able to easily identify our primary leaking Java class and data structure.

Conclusion

I hope this simple Java program and Heap Dump analysis tutorial has helped you understand the basic principles of Java Heap analysis using the raw Heap Dump data. This analysis is critical when dealing with OutOfMemoryError: GC overhead problems since those are symptoms of either Java Heap leak of Java Heap footprint / tuning problem.

Reference
http://www.javacodegeeks.com